 Save
Save I'll never forget the year my sister challenged me to create something that looked as beautiful as it tasted for our family's holiday party. I was standing in my kitchen, surrounded by wheels of cheese and fresh herbs, when it hit me—what if we made edible ornaments? That's when these Holiday Ornament Clusters were born. Now they're the first thing to disappear from our appetizer table, and guests always ask how we made something so festive and foolproof.
I'll always remember the moment my nine-year-old nephew pointed at the platter and gasped, 'Mom, are these real ornaments?' His face when he realized he could actually eat them was pure magic. That's when I knew this recipe was special—it brings joy before it even hits the plate.
Ingredients
- Cream cheese, softened (8 oz): This is your foundation—use room temperature cheese and it'll blend silky smooth without lumps. I learned the hard way that cold cream cheese creates a grainy texture, so pull it out of the fridge 30 minutes before you start
- Shredded sharp cheddar cheese (1 cup): The sharpness cuts through richness and gives these ornaments a savory backbone that makes people reach for another one
- Shredded mozzarella cheese (1 cup): This melts into the mixture and helps bind everything together while adding a gentle, creamy quality
- Fresh chives, finely chopped (2 tbsp): These add a whisper of onion flavor that prevents the cheese from becoming one-dimensional—don't skip them
- Dijon mustard (1 tbsp): Just a little gives the whole thing a sophisticated tang that makes guests wonder what the secret ingredient is
- Garlic powder (1/2 tsp): A subtle backdrop that makes the cheese taste more like itself, if that makes sense
- Salt and pepper, to taste: Taste as you go—cheese saltiness varies, so you're the judge here
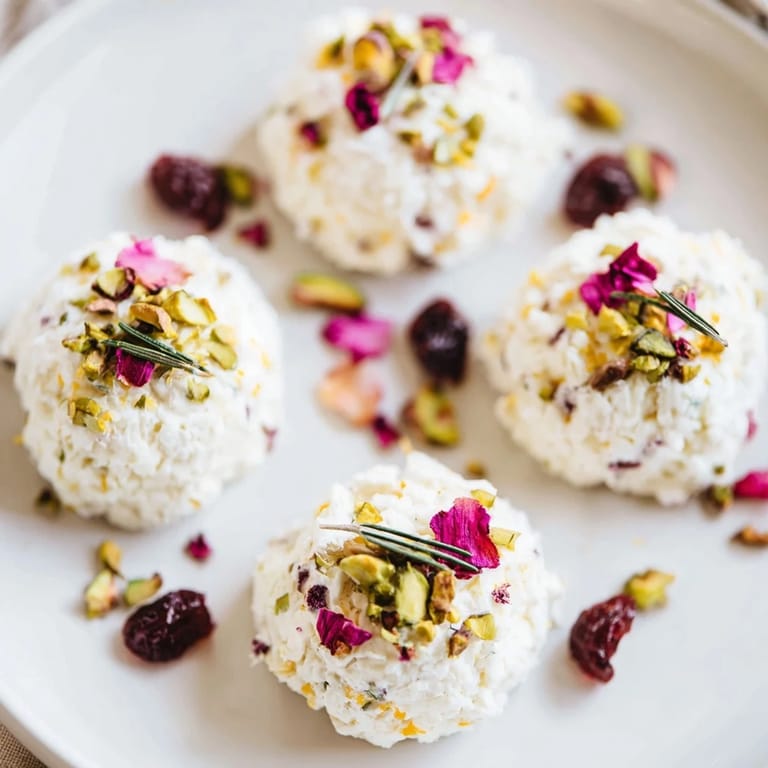
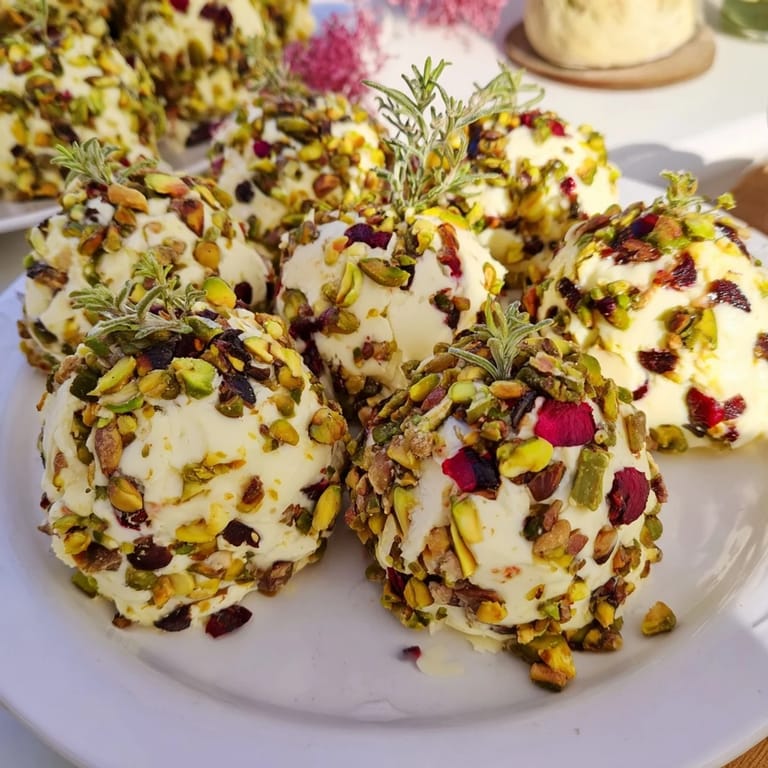
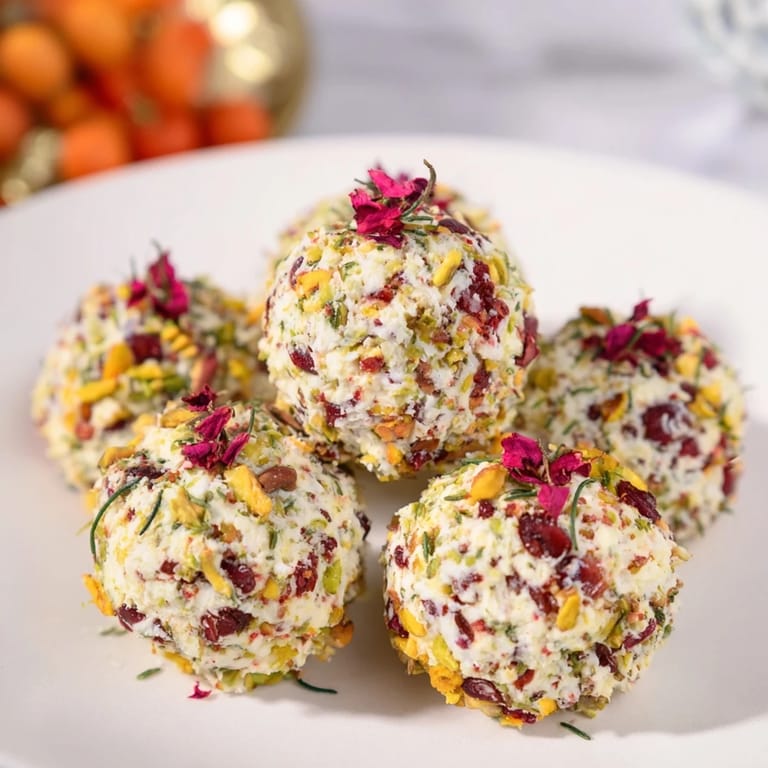
- Ornament coatings (choose 3–4): Pick from finely chopped pistachios, dried cranberries, poppy seeds, parsley, roasted red peppers, or walnuts—each one brings its own personality and color to your platter
- Fresh rosemary sprigs (12 small ones): These become your ornament hooks and add an aromatic touch that screams homemade
- Assorted crackers or sliced baguette (optional): For serving alongside, choose whatever brings you joy
Tired of Takeout? 🥡
Get 10 meals you can make faster than delivery arrives. Seriously.
One email. No spam. Unsubscribe anytime.
Instructions
- Mix your cheese base:
- In a medium bowl, combine your softened cream cheese, both cheeses, chives, Dijon mustard, garlic powder, salt, and pepper. Blend it together with a spatula until it's completely smooth and feels like one cohesive mixture. There shouldn't be any streaks of white cream cheese or orange cheddar left—everything should look unified and creamy. This takes about 2 minutes of gentle folding.
- Portion and roll:
- Divide the mixture into 12 roughly equal portions—I use a cookie scoop to make them consistent, which helps them cook and look uniform. Roll each portion between your palms, pressing gently but confidently until you have smooth, tight balls. If the mixture feels too soft, pop everything in the fridge for 10 minutes first, and they'll come together much more easily.
- Create your colorful coatings:
- Pour each of your chosen coating ingredients into its own shallow bowl—a cereal bowl or small plate works perfectly. Now here's where it becomes fun: take 3 or 4 cheese balls and roll them around in one coating until they're fully covered and look jewel-like. Move to the next coating and repeat. You'll end up with distinct clusters, each one dressed in its own beautiful color.
- Arrange into ornament clusters:
- Gather your coated cheese balls and arrange them on your serving platter in tight groups of 3 or 4, nestled close together like ornaments hanging from the same branch. Leave a little space between clusters so each one reads as a separate decoration. Step back and look at your work—it should look like a holiday treasure chest.
- Add the finishing touch:
- Take one small rosemary sprig and gently insert it into the top of each cluster, pressing it down just enough that it feels secure. It should look like the ornament's hook or hanger. The green against the colorful cheese balls is absolutely stunning.
- Serve or store:
- You can serve these immediately while they're at their freshest, or cover them with plastic wrap and refrigerate until party time—they'll keep beautifully for up to 3 days. If you've made them ahead, let them sit at room temperature for 10 minutes before serving so the cheese softens just slightly and tastes its best.
 Save
Save There was a moment last December when my friend Maria took a bite of one of these, closed her eyes, and said, 'This tastes like the holidays feel.' That's exactly what I hope happens when you make them—that these little cheese balls become more than just food. They become part of the memory of the gathering itself.
Making Them Picture-Perfect
The secret to these looking like they belong on a magazine cover is all about contrast and grouping. Choose coatings that are visually different from each other—pair the green pistachio balls with the deep red cranberries and the pale poppy seeds, for example. When you arrange them by coating cluster, your platter tells a story of color and abundance. I always leave the rosemary sprigs slightly visible at the top because that's what catches the eye and makes people realize these are edible ornaments, not decorations.
Flavor Combinations That Work
The beauty of this recipe is that the cheese base is savory and elegant, which means it plays nicely with both sweet and nutty coatings. The cranberries bring brightness and tartness. The pistachios add an earthy sophistication. The poppy seeds create a delicate crunch. I've learned that mixing textures on a single platter matters as much as mixing colors—it keeps people interested and reaching back for more. You could even make a smaller batch with just two coatings if you're short on time, and it would still be absolutely showstopping.
Make-Ahead Magic and Timing
One of my favorite discoveries with this recipe is that you can prepare it in stages without losing any magic. You can make the cheese base and roll the balls the day before, storing them in an airtight container in the fridge. You can even prep your coating ingredients in advance and keep them in separate small jars. The only part that should happen close to serving time is the final assembly—rolling the balls in their coatings and arranging them on the platter. This keeps them looking fresh and prevents the coatings from getting damp. If you're hosting, doing your prep work 24 hours ahead means you can spend the party actually enjoying your guests instead of frantically rolling cheese balls in the kitchen.
- Refrigerate the cheese mixture for 10 minutes between rolling batches if it gets too soft
- Choose coatings that are finely chopped or minced so they stick to the cheese and create an even coating
- If your coatings seem too chunky, pulse them in a food processor for 10 seconds to get a more uniform texture
 Save
Save These Holiday Ornament Clusters have taught me that the best appetizers are the ones that make people smile before they even taste them. They're your gateway to being the person who brought the beautiful, delicious, conversation-starting dish to the party.
Recipe Questions & Answers
- → What cheeses are used in the clusters?
The clusters combine cream cheese, shredded sharp cheddar, and mozzarella for a creamy and flavorful base.
- → How do I create the ornament-like look?
Cheese balls are rolled in various coatings, then arranged in groups of three or four, with a rosemary sprig inserted on top to resemble a hook.
- → Can I prepare these in advance?
Yes, prepare cheese balls and coatings separately and assemble just before serving for best freshness and presentation.
- → What coating options are recommended?
Try chopped pistachios, dried cranberries, poppy seeds, parsley, roasted red peppers, or walnuts for varied textures and flavors.
- → Are these suitable for special diets?
They are vegetarian and can be gluten-free if served with gluten-free crackers or bread.