 Save
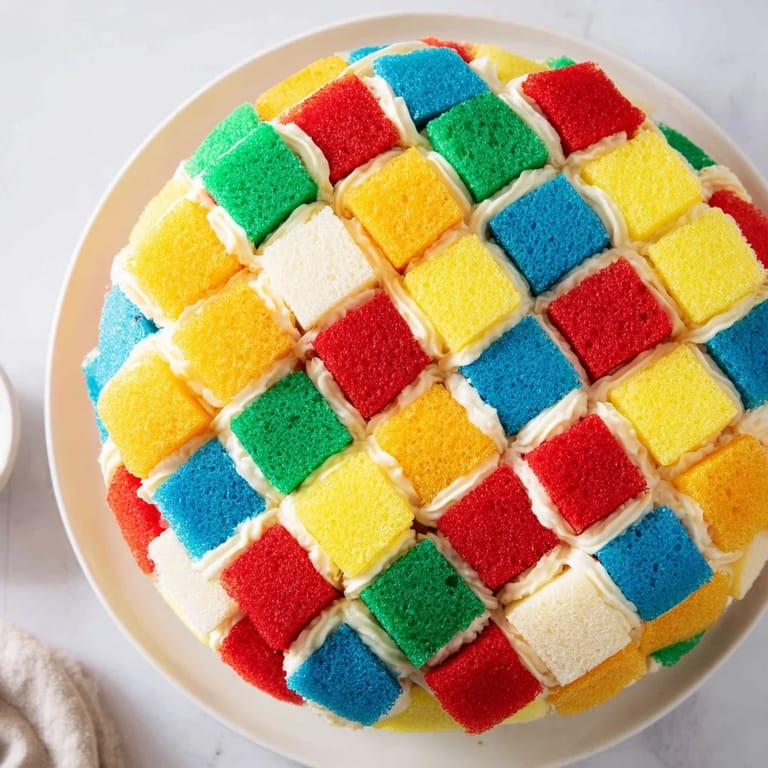
Save I still remember the afternoon my grandmother pulled out her old quilting magazine and said, 'You know, a cake could look like this too.' That sparked something in me—the idea that dessert could be as much about visual storytelling as it was about taste. Years later, when I finally made this Cozy Quilt Patchwork Cake, I understood what she meant. It's not just a cake; it's edible art that brings people together, each colorful square telling its own small story on the plate.
The first time I served this cake at a dinner party, I watched my friends' faces light up when they saw it emerge from the kitchen. One guest actually gasped. That moment—seeing something I'd made with my own hands bring that kind of joy—made every minute of careful assembly worth it.
Ingredients
- All-purpose flour (350 g): The foundation of your tender crumb—don't sift unless your flour is particularly lumpy, as this cake benefits from a slightly denser structure that holds the colored squares together
- Granulated sugar (300 g): Creates lift and moisture; this is your sweetness base, so don't skimp on quality here
- Baking powder (2 ½ tsp): Your rising agent—make sure it's fresh, as old baking powder won't give you that airy crumb you need
- Salt (½ tsp): Enhances flavor and balances sweetness; it's easy to forget but makes a real difference
- Unsalted butter (250 g for batter, 350 g for frosting): Softened to room temperature is non-negotiable—cold butter won't cream properly and you'll lose volume
- Large eggs (4): Room temperature eggs incorporate better and create a more stable batter; take them out 30 minutes before baking
- Whole milk (250 ml): The secret to keeping this cake incredibly moist—don't use skim, as you need that fat content
- Vanilla extract (2 tsp for batter, 2 tsp for frosting): Pure vanilla makes a noticeable difference in the final flavor
- Food coloring gels (red, yellow, green, blue, purple): Gel colors are essential—liquid food coloring will thin your batter and muddy your hues; gel gives you vibrant, true colors
- Powdered sugar (500 g): Sifted before measuring prevents lumps in your frosting and ensures smoothness
Tired of Takeout? 🥡
Get 10 meals you can make faster than delivery arrives. Seriously.
One email. No spam. Unsubscribe anytime.
Instructions
- Prepare Your Workspace:
- Preheat your oven to 180°C (350°F) and line five 20 x 20 cm square pans with parchment paper, making sure the edges come up slightly. Grease them generously—you want your cakes to release cleanly so those squares stay perfect. If you don't have five pans, don't worry; you can bake in batches, keeping the batter at room temperature between rounds.
- Cream the Base:
- Cut your softened butter into chunks and place it in a large mixing bowl. Using an electric mixer on medium speed, beat it for about 2 minutes until it's pale and fluffy—this incorporates air into the batter, which is crucial for a tender crumb. Gradually add your granulated sugar, continuing to beat for another 3-4 minutes until the mixture looks like fluffy clouds. This step is worth taking your time on; rushing it means a denser cake.
- Add the Eggs:
- Crack each egg into a small bowl first, then add them to the creamed mixture one at a time, beating well after each addition. This prevents curdling and ensures even distribution. Pour in your vanilla extract and mix until everything is well combined and glossy.
- Combine Dry Ingredients:
- In a separate bowl, whisk together your flour, baking powder, and salt. This distributes the leavening agent evenly—don't skip this step even though it seems simple.
- Alternate Wet and Dry:
- Beginning with the flour mixture, alternate adding the dry ingredients and milk to your wet ingredients, starting and ending with flour. Add about a third of the flour, mix until just combined, then half the milk, then another third of flour, then the remaining milk, and finally the last of the flour. Mix only until you don't see streaks of flour—overmixing develops gluten and makes the cake tough.
- Divide and Color:
- Divide your batter evenly among five bowls—I use a kitchen scale for accuracy here, aiming for about 220-240 g per bowl. Working with one bowl at a time, add a few drops of gel food coloring and stir gently but thoroughly until the color is completely even and there are no streaks. The colors should be vibrant but not neon; if you go too dark, they can taste a bit artificial.
- Bake the Layers:
- Pour each colored batter into its prepared pan and spread it level with an offset spatula—take a moment to make sure each layer is the same thickness. Bake for 20-25 minutes, checking around the 20-minute mark by inserting a toothpick in the center; it should come out clean or with just a few moist crumbs. Your kitchen will smell absolutely incredible at this point.
- Cool Properly:
- Remove the cakes from the oven and let them cool in their pans for 10 minutes—this allows the structure to set without being so cool that they crack when you turn them out. Turn each cake out onto a cooling rack and let them cool completely at room temperature. This takes at least an hour, but you can speed it up slightly by placing the racks in a cool spot.
- Make Your Frosting:
- While the cakes cool, beat your room-temperature butter until it's pale and creamy, about 2-3 minutes. Add your sifted powdered sugar gradually—if you dump it all in at once, you'll have a cloud of sugar dust and lumpy frosting. Beat until combined, then add your vanilla and a pinch of salt. Add milk one tablespoon at a time until you reach a spreadable consistency; you want it thick enough to hold the cake layers together but soft enough to smooth with a spatula.
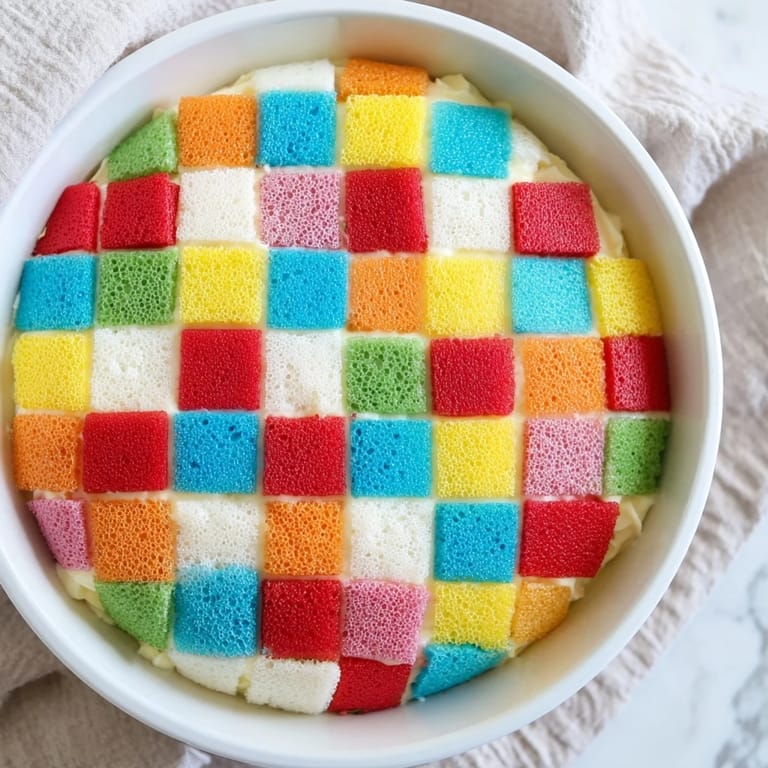
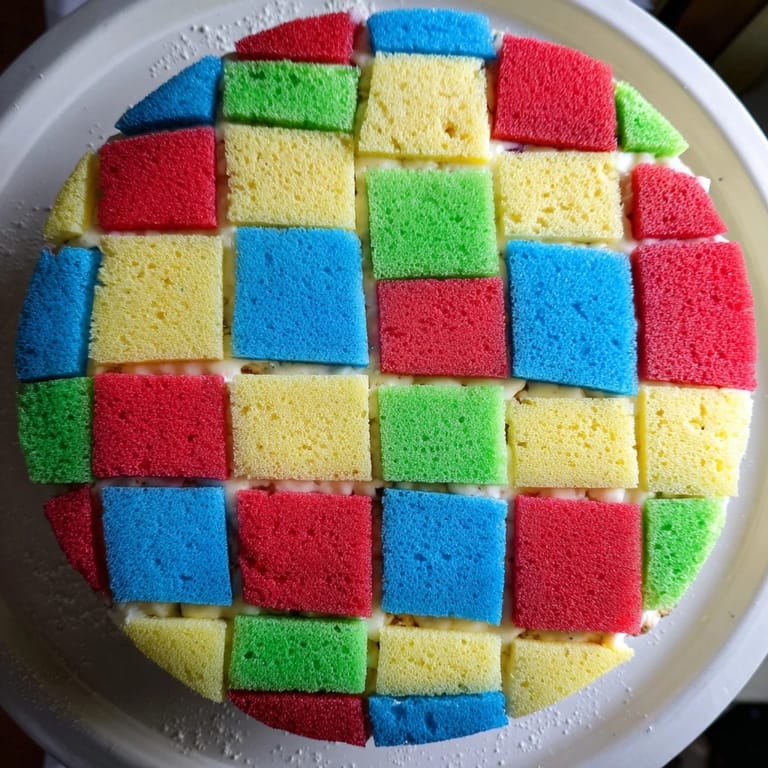
- Trim and Cube:
- Once the cakes are completely cool, trim off any domed or darkened edges using a serrated knife—this gives you neat, even squares. Cut each colored sponge layer into uniform squares about 3 x 3 cm; you can use a ruler or the side of your measuring cup as a guide. This is where patience pays off; uniform squares make assembly so much easier and look more intentional.
- Build the Patchwork:
- On a large tray or cake board, begin arranging your colored squares in an alternating pattern, like a real quilt. Use a thin layer of buttercream between each square to glue them together as you go—think of it like the stitching that holds a quilt together. Build up layers, rotating your color pattern with each layer so the patchwork effect continues vertically as well as horizontally. This is the most meditative part; take your time and step back occasionally to admire your progress.
- Frost and Finish:
- Once your patchwork structure is complete, apply a thin layer of buttercream over the entire top and sides, smoothing it as much as you like or leaving it slightly textured—both look beautiful. If you want to enhance the quilt effect even more, fit a piping bag with a small round tip, fill it with buttercream, and pipe thin lines between your squares to emphasize the patchwork pattern. This is optional but creates a really striking visual.
- Chill Before Serving:
- Pop the finished cake into the refrigerator for at least 30 minutes. This sets the frosting and makes slicing cleaner. When you slice into it, you'll see all those beautiful colored squares in cross-section—it's just as stunning from the side as it is from the top.
 Save
Save I think what I love most about this cake is that it tells a story. Every color represents something different, something special, and when you bring them all together, they create something that's greater than any single piece. That's a lesson I learned from my grandmother's quilting, and it feels right to have baked it into this cake.
The Art of Color in Baking
When I first made this cake, I made the mistake of using liquid food coloring because that's what was in my pantry. The result was beautiful in theory but disappointing in practice—the colors weren't as vibrant, and the batter was slightly thinner. Gel coloring is worth seeking out because it gives you control. A tiny dab, mixed in thoroughly, creates saturated, true colors that don't fade or muddy in the oven. If you want softer, pastel colors, use less gel; if you want jewel tones, use a bit more. But always, always use gel. Your future self will thank you when you pull a stunning patchwork cake from the cooling rack.
Making This Cake Your Own
While the classic five-color version is beautiful, this recipe is genuinely flexible. I've made it with just three colors for a more minimalist look, and I've also done seven colors for a truly intricate quilt effect. You could also divide the batter into fewer bowls and make thicker layers, or add flavor variations—a hint of almond extract, lemon zest, or even a touch of cardamom in the batter transforms the taste while keeping the visual concept intact. The frosting is equally customizable; I've made it with cream cheese for tang, or tinted it with a tiny bit of the same gel coloring to echo the cake squares.
Storage and Serving Suggestions
This cake keeps beautifully in the refrigerator for up to four days in an airtight container, and the flavors actually meld and deepen slightly as it sits. You can also freeze it for up to two months, though I recommend wrapping it well in plastic wrap to prevent freezer burn. When you're ready to serve, take it out about 30 minutes before slicing so it's not ice-cold; room temperature brings out the buttery flavor of the frosting. It pairs wonderfully with a simple accompaniment—a dollop of lightly sweetened whipped cream, fresh berries, or even a small glass of dessert wine to balance the richness.
- For a special touch, serve thin slices on dessert plates with a small pile of fresh raspberries or a light fruit compote
- Individual squares can be wrapped and given as gifts; they're as pretty as they are delicious
- If you're not confident about your frosting smoothness, a light dusting of edible glitter or pearl dust adds intentional shimmer and covers minor imperfections
 Save
Save This cake is more than dessert; it's a conversation starter and a reminder that beautiful things take time and intention. Every time I make it, I'm transported back to that moment with my grandmother, and every time someone tastes it, I get to be part of their memory too.
Recipe Questions & Answers
- → How do I achieve the vibrant colors in the sponge layers?
Use gel food coloring gels for vivid hues without thinning the batter, ensuring bright, defined squares in the final cake.
- → Can I prepare the sponge layers ahead of time?
Yes, bake the colored sponge layers in advance and store them wrapped tightly in the refrigerator to maintain freshness until assembly.
- → What is the best way to assemble the patchwork pattern?
Trim edges evenly and slice each sponge into uniform squares. Arrange squares in alternating colors on a tray, using a thin layer of buttercream to hold them together for a neat quilt effect.
- → How should I store the finished cake?
Keep the cake refrigerated until ready to serve to preserve the buttercream texture and maintain the colorful appearance.
- → Are there any flavor variations recommended?
Enhance the sponge batter by adding citrus zest or almond extract for extra flavor dimension while maintaining the original structure.