 Save
Save My sister showed up one Saturday with a tub of cream cheese and a sleeve of Oreos, insisting we could make something impressive in under an hour. I was skeptical until I watched her pulse cookies into crumbs and mix them into a dark, velvety dough that tasted like childhood and indulgence all at once. We rolled them into wobbly spheres, dunked them in melted pink candy coating, and by the time they set, I was already planning the next batch. The snap of that candy shell against the creamy center became my favorite sound in the kitchen. These truffle balls have since become my go-to for every birthday, baby shower, and random Tuesday craving.
I brought a platter of these to a potluck once, and they disappeared before the main course even hit the table. A coworker asked if I had ordered them from a boutique bakery, and I loved telling her it was just cookies and cream cheese. There is something deeply satisfying about watching people assume complexity when the truth is so delightfully simple. The pink coating made them look festive and polished, but honestly, I have made them in white, pastel blue, and even dark chocolate depending on my mood or the occasion. Every version gets the same enthusiastic response.
Ingredients
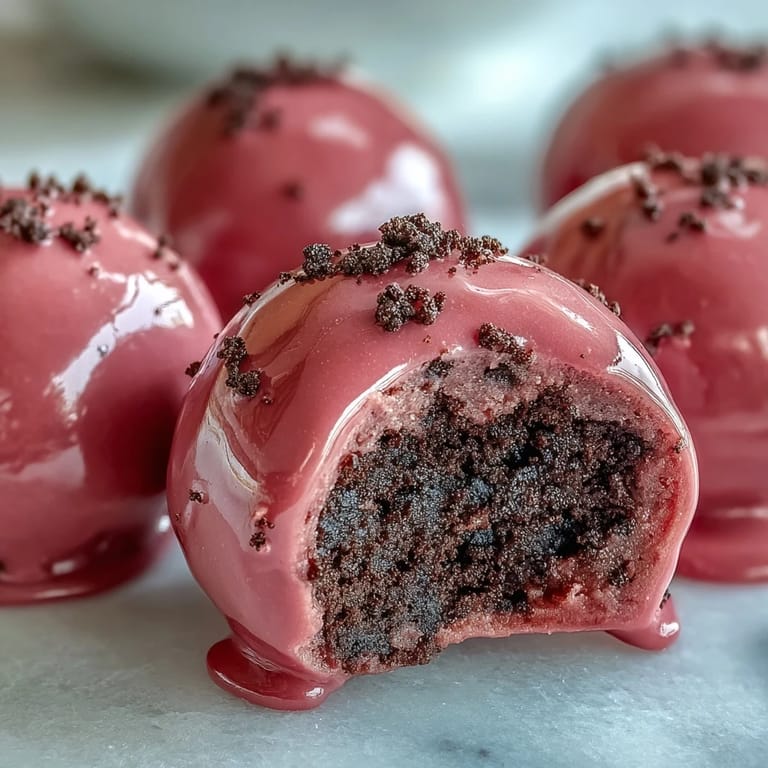
- Oreo cookies: Use the whole cookie, filling and all, for maximum flavor and the signature speckled look when you slice into the truffles. I have tried swapping in other sandwich cookies, but nothing quite matches the deep cocoa richness of Oreos.
- Cream cheese: Let it sit on the counter for at least 30 minutes before mixing so it blends smoothly with the crumbs without clumping. Cold cream cheese will leave you with lumpy, uneven dough that is harder to roll.
- Pink candy melts: These wafer style coatings melt easily and harden with a glossy finish that does not require tempering like real chocolate. If you cannot find pink, buy white and tint them with oil based food coloring, never water based or the coating will seize.
- Vegetable shortening: A small spoonful thins the melted candy just enough to make dipping smoother and gives the coating a silkier sheen. Skip it if you prefer a thicker shell, but I always add it for easier coverage.
- Sprinkles or edible pearls: These are purely decorative, but they add a playful touch and help cover any imperfections in the coating. I keep a variety on hand so I can match the truffles to whatever theme or season is happening.
Tired of Takeout? 🥡
Get 10 meals you can make faster than delivery arrives. Seriously.
One email. No spam. Unsubscribe anytime.
Instructions
- Crush the cookies:
- Pulse the Oreos in a food processor until they turn into fine, even crumbs with no large chunks remaining. If you do not have a processor, seal them in a sturdy zip top bag and roll over them with a rolling pin until they are uniformly broken down.
- Mix the truffle base:
- Combine the cookie crumbs and softened cream cheese in a bowl, stirring with a spatula until the mixture is smooth, dark, and uniform. It should hold together like thick dough when pressed.
- Shape the truffles:
- Scoop out tablespoon sized portions and roll them between your palms into firm, even balls. Arrange them on a parchment lined baking sheet as you go.
- Chill until firm:
- Refrigerate the shaped truffles for 30 minutes, or freeze them for 15 minutes if you are in a hurry. They need to be cold and solid before dipping or the coating will not set properly.
- Melt the candy coating:
- Microwave the pink candy melts in a bowl at medium power in 30 second bursts, stirring between each interval until completely smooth. Stir in the vegetable shortening if using for a thinner, shinier consistency.
- Dip each truffle:
- Use a dipping fork or regular fork to lower each chilled truffle into the melted candy, turning to coat completely, then lift and tap gently against the bowl edge to shake off excess. Return each coated truffle to the parchment lined tray.
- Decorate while wet:
- If you are adding sprinkles or pearls, do it immediately after dipping while the coating is still soft and tacky. Once the candy hardens, decorations will not stick.
- Let the coating set:
- Allow the truffles to rest at room temperature until the coating is firm and no longer shiny, or speed up the process by chilling them in the fridge for 10 to 15 minutes. They should feel dry and solid to the touch before serving or storing.
 Save
Save The first time I made these for a friend's bridal shower, I packaged them in little cellophane bags tied with ribbons, and guests kept asking where I had ordered them from. When I finally admitted I had made them in my kitchen that morning, the room went quiet, then erupted in requests for the recipe. It felt like sharing a secret handshake, this ridiculously simple trick that looked like pastry school handiwork. I have been making them ever since, not just because they taste incredible, but because they carry that same magic every single time.
Choosing Your Candy Coating
Pink candy melts are my favorite for these truffles because they add a cheerful, whimsical vibe without being overly sweet or artificial tasting. I have also used white, pastel yellow, mint green, and deep chocolate depending on the occasion, and each color changes the entire mood of the dessert. If you want to tint your own, invest in a small bottle of oil based candy coloring and add it drop by drop until you reach your desired shade. Water based food coloring will ruin the coating completely, turning it grainy and impossible to work with, so always double check the label before you squeeze.
Storing and Serving Tips
These truffles taste best when served chilled, straight from the fridge, because the candy shell stays crisp and the center remains firm and creamy. I store mine in an airtight container with sheets of parchment between the layers to prevent them from sticking together or smudging. They will keep beautifully in the refrigerator for up to a week, though they rarely last that long in my house. If you are making them for a party, you can prep them two or three days ahead and pull them out an hour before serving so they are still cold but not rock hard.
Customizing Your Truffles
Once you master the basic recipe, the variations are endless and endlessly fun to experiment with. I have stirred mini chocolate chips into the truffle base for extra texture, swapped regular Oreos for mint or peanut butter versions, and even rolled the finished truffles in crushed graham crackers or toasted coconut before the coating set. You can also drizzle contrasting candy melts over the top for a bakery style finish, or press a single edible flower petal onto each truffle for an elegant touch.
- Try using golden Oreos and yellow candy coating for a sunny, vanilla forward version.
- Add a teaspoon of espresso powder to the cream cheese mixture for a subtle mocha kick.
- Roll the truffles in finely chopped nuts, shredded coconut, or cookie crumbs before dipping for added crunch and visual interest.
 Save
Save Every time I pull a batch of these from the fridge and hear that satisfying snap of the candy shell, I am reminded why simple recipes are often the most rewarding. They prove that you do not need fancy techniques or rare ingredients to create something that feels special, generous, and worth sharing.
Recipe Questions & Answers
- → Can I use a different cookie instead of Oreos?
Yes, you can substitute with similar cream-filled chocolate sandwich cookies. Keep in mind that different cookies may alter the flavor and texture slightly, but the method remains the same.
- → How do I prevent the candy coating from cracking?
Make sure your truffle balls are well-chilled before dipping, and avoid temperature shock by letting them sit at room temperature for 2-3 minutes before coating. Adding vegetable shortening to the melted candy also helps create a smoother, more flexible coating.
- → Can I freeze these truffle balls for longer storage?
Absolutely. Store them in an airtight container with parchment between layers and freeze for up to 3 months. Thaw in the refrigerator for a few hours before serving.
- → What if I don't have a food processor?
Simply place the Oreos in a sealed zip-top bag and crush them with a rolling pin until fine crumbs form. This manual method works just as well and requires no special equipment.
- → How can I make the coating different colors?
Use white candy melts and tint them with oil-based food coloring in any shade you prefer. Avoid water-based coloring as it will cause the candy melts to seize and become unusable.
- → Why is my candy coating too thick to dip smoothly?
Stir in 1 teaspoon of vegetable shortening or coconut oil to thin the melted candy coating. This will give you a smoother consistency that's easier to work with and creates a thinner, more elegant shell.